Hide Files Behind JPEG Image Using Command Prompt
Hiding files by some sort of software has been a very common way till now, but if you are looking for something different you can do it by hiding a file behind a jpg image. We have written two more Articles about hiding files or folders in Windows XP. A handy and secured way to Hide Files and Folders in Windows XP and Hide Files or Folders in the Command Prompt in Windows XP.

But here I am going to introduce another interesting way. You can use this simple trick to hide any kind of file like txt, mp3, exe, avi or whatever else. Besides this you can hide multiple number of files behind a single jpg file. When any one will see the picture he/she will just consider it as a picture and even if he/she double click on it then the picture will be opened as normal. Isn’t it sounds interesting?
To execute this task you must need WinZip or WinRar to be installed in your PC. You can download it absolutely free from internet. I have described the whole process here
How to hide the files behind JPEG image
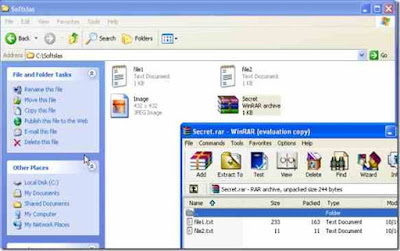
Step 1. Create a folder anywhere in your PC e.g. C > Softslas and keep all the files you want to hide as well as the jpg image you will use to keep that files in.Step 2. Just select all the files you want to hide, and by right clicking on them select the option of add them to a compressed ZIP or RAR file. Only compress the files you want to hide, not the jpg image. Lets name it as “Secret.rar”.
You’ll see that there is those files, the jpg image and a compressed archive named Secret.rar inside the folder Softslas.

Step 3. Now i will tell you how to make the trick.Click on Start
menu, click Run and type “cmd” (without the inverted commas), press
enter and you will see the command prompt window has been opened. Type
cd to get into the root directory and again type cd followed by the
folder’s name you want to hide i.e. “cd Softslas”. Now you are inside
the directory C > Softslas>.
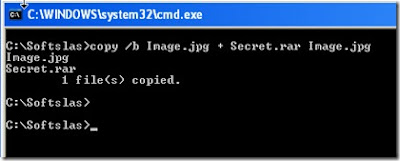
Step 4. Suppose the jpg image have name of “Image.jpg”. Type the following line
Be sure that the compressed file has the extension of . ZIP or .RAR. As I have heard about some problems people faced while using WinZIP, I recommend you to use WinRAR instead of WinZIP.
That’s all you have to do. Now you have a jpg image with your secret files inside it. If you check the picture size you will see it has been increased by same size that was of the compressed archive. Now you can the delete the . RAR file and the file1 and file2.
If you know some other process then please let us know in comment box
Step 4. Suppose the jpg image have name of “Image.jpg”. Type the following line
copy /b Image.jpg + Secret.rar Image.jpg(Omit the quotes) and press enter.You will get a response in the command prompt like below.
Be sure that the compressed file has the extension of . ZIP or .RAR. As I have heard about some problems people faced while using WinZIP, I recommend you to use WinRAR instead of WinZIP.
That’s all you have to do. Now you have a jpg image with your secret files inside it. If you check the picture size you will see it has been increased by same size that was of the compressed archive. Now you can the delete the . RAR file and the file1 and file2.
How to access the hidden files
Just right click on the file and chose open with WinRar.Then you can see the file you hide behind the picture. Another way to access the hidden file is that just change the extension of the file to .RAR and open the file using WinRar and then extract them. If you know some other process then please let us know in comment box


Comments
Post a Comment